


Plaid is making a comeback. We see it in fashion and now in home décor. We gave it a try on door hangers and found that while it takes several steps, it’s not difficult.
I’m going to walk you through all the steps to turn an 18” ornament shape into a plaid door hanger. While I used red and black for a Christmas-themed door hanger, we’ve also done it with orange and dark brown on a pumpkin. I do not recommend using metallic paints for this technique. The shape we are using is an 18″ Ornament from our favorite woodcutters – Build-a-Cross.
 1. Start by base coating you door hanger with red paint. We used DecoArt’s Tuscan red Patio Paint. I think blue or green would make great plaids, too. It will take 2 or 3 coats. For a super smooth finish, spread your paint on with a pouncer (round foam applicator). This will take more coats than using a brush, but it will be super smooth with no brush strokes. I did the top of my ornament in silver, but white or black or another neutral color would work just fine.
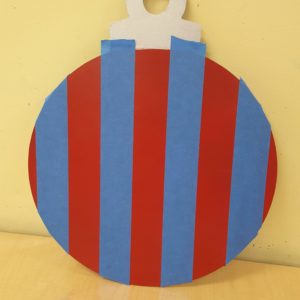 2. Once your shape is thoroughly dry, apply painters tape in stripes vertically. I used a 2 inch tape for a broader plaid. To get even spacing, I used an extra piece of tape between each piece. I started with one piece of tape straight down the middle, measuring to make sure it is centered. I then place tape on either side of the first strip. Then I removed the center strip and used that piece of tape as a spacer for additional stripes. Once all the pieces of tape are applied, press each edge down with your finger to make sure the tape is completely sealed.
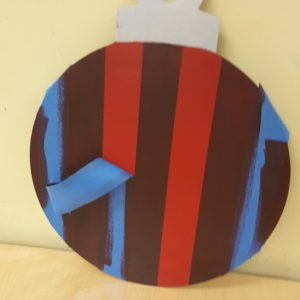 3. The next step is to paint your first set of stripes. Mix about 5 parts of your base color (red, in our case) and mix it with 1 part of your stripe color (I used Deco Art’s Mars Black). Stir it up well. I mixed up enough paint to fill two wells in one of our palettes so I’d have enough for all the stripes.
4. Paint one coat of this new color between the tape strips. Only use one coat, and spread the paint out using long smooth strokes. You will get some paint on the tape, no worries. Dry the paint well and remove the tape, saving it for a later step.
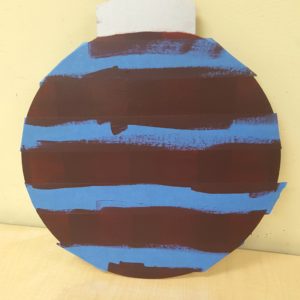 5. Now you are going to repeat the same steps, only placing the tape horizontally. Use new strips of tape for this step, as you’ll need the tape you just peeled off for a later step. Paint the stripes using the same paint you used for the vertical stripes. Dry the paint thoroughly, but do not remove the tape when you are done.
I know it looks pretty strange right now, but believe me, you are getting close to gorgeous!
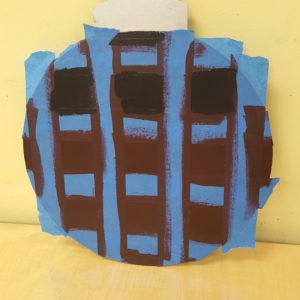 6. Now take the tape you removed from your vertical stripes and replace it, following the lines of paint to make sure you’ve put it right back where it was in Step 2.
7. Mix about 5 parts of your second color (black, in my example) and mix it with 1 part of your first color (red, in my example). Use that color to paint the squares that remain exposed. That will be the intersection of your stripes. Once you’ve painted all the squares, dry completely, then begin peeling back your tape.
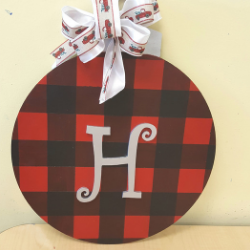
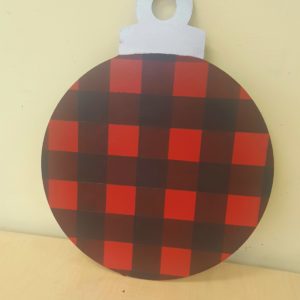 Voila! You have a Plaid Christmas Ornament! There are several ways to finish off the look. We added a letter painted with DecoArt’s Silver Dazzling Metallic. I know I said “don’t use metallics” but that’s only for the plaid part of the design. You can certainly accent with metallics. I painted the hanger part of the ornament with the silver paint, too.
This is a very simple plaid. You can make it more complicated by taping off tiny stripes in between the bigger stripes or actually on the stripes, or by using a paint marker to draw those lines. If you are looking for a plaid pattern to copy, swing by your local fabric store to check out the patterns. Or just look in your closet!
