


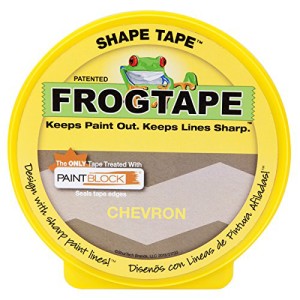
One of my favorite things to do at Cut & Paste is to show customers how to make crafting simpler. One of the most common techniques we use is masking off areas with tape. We buy rolls of painter’s tape by the dozen. But last year, we found a really cool kind of masking tape called Shape Tape. Made from the same people who make Frog Tape, these tapes come in shapes – chevrons, waves and scallops.
Using these tapes is pretty simple. We paint our project one color. Lay down the tape. Then paint another color. Pull up the tape and voila! You have chevrons.
There are a few more tricks to using these great tapes and I’m going to walk you through them here.
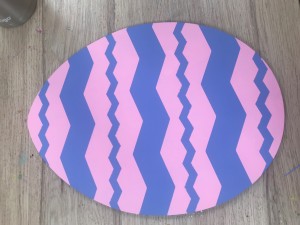
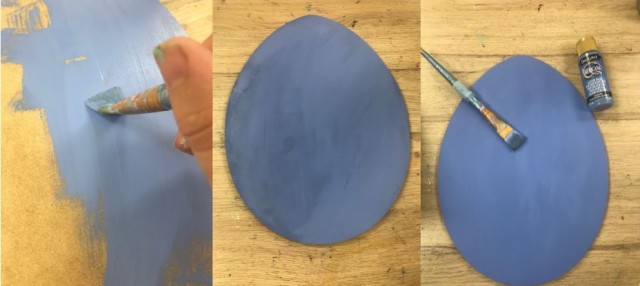
The first step in using shape tape is to choose your project. These sorts of masking tapes work best on projects with a large space to paint on. I wouldn’t recommend using this sort of tape on something like a monogram or a word where the design will be broken up by the shape of the wood. For our example we used a 12″ wooden egg shape (leftover from Easter). These tapes work well on projects like jockey silks, pineapples, and pumpkins. Shapes with lots of “real estate” for design. Your first step is to base coat the entire piece.
The next step is placing the shape tape. Measure the length you need and tear off. There is a thin dusting of something like cornstarch on the top of the tape to keep it from getting sticky. I recommend wiping the top of each piece of tape with a slightly damp paper towel to remove it. Otherwise it can sometimes gum up the paint.
These tapes come with a backing that you’ll have to peel off. Place your first piece of tape on your project and seal it tightly with the edge of your fingernail.
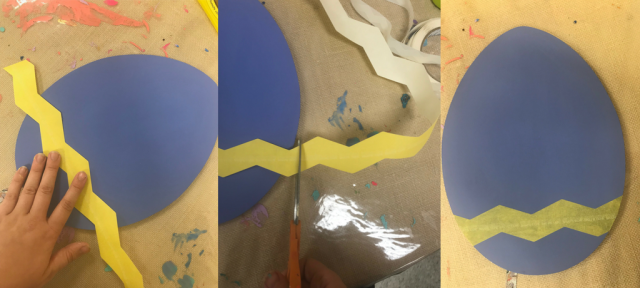
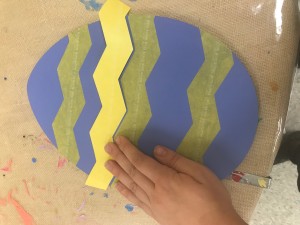 Next you’ll need to decide the amount of space you want between your chevrons. Remember, whatever is covered with tape will remain the base color. The space between the rows of tape will be your second color. If you want a skinny little chevron, place your rows of tape close together. If you want a fatter one, leave more space between the rows.
Our favorite way to space the chevrons is to cut a second piece of tape and use it as a spacer. You’ll put it right next to the first row, then add your third row on the other side of it. Then peel up the 2nd piece and you have a perfectly spaced chevron.
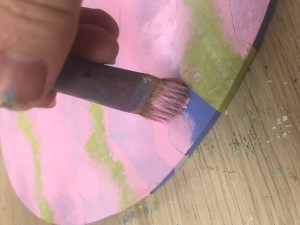 After all of your pieces of tape are sealed down, its time to paint. You’ve got a couple of choices on how to do that. You can use a brush, just like normal, and paint on smooth, thin coats. This works well with colors that cover well and don’t need many coats. I prefer to use a foam pouncer and with allows you to daub the paint on. It does leave the paint with a bit of texture, but it is a faster way to paint.
If you are using a color like white, yellow (we hate yellow), or the very darkest purple, Pansy Purple, USE THE POUNCER. Otherwise, you’ll be painting coats all day. If you have to put on too many coats of paint, you risk the paint peeling up with the tape when you pull it off. If possible, make your base coat your lightest color.
I don’t recommend using our Decoart Dazzling Metallics paints with these tapes. I adore the look of these paints, but its very clique-ish and would much prefer to stick to itself than to the wood, and we find it often pulls up with the tape after it dries. If you must use it, be sure to pull the tape up before it dries.
When you are done, carefully pull the tape up. No need to wait for the paint to dry!
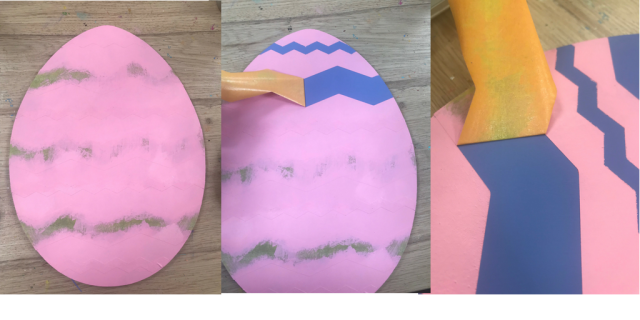
If you have a few leaks or bleeds, don’t fret. There are a some tricks we can show you to fix up those spots. For next time, remember to carefully seal every edge of the tape, and try to avoid paint toward the edge of the tape, brush along the direction of the tape instead. Also, choosing colors that require fewer coats of paint can minimize the bleeding risk.
 We have a line of thinner chevron tape, too, and Melissa mixed and matched these two tapes on the Easter Egg. I like the effect it gives.
Next time you are in the shop, ask one of our staff if you can try out some shape tape. The wave tape looks great on summer seashore projects, the scallop tape makes great feathers on an owl, or scales on a fish, and chevrons look great on everything!
